These maps show our caravan’s route during the Jade Regent campaign, as it traveled across Avistan on its journey to the Crown of the World and Tian Xia beyond.
Note: Due to the issues reported by other players and GM’s during their own campaigns, and Paizo’s own admission that the rules were not sufficiently play tested, we have opted to drop the caravan combat rules completely and instead focus on the caravan logistics. All combat encounters along the way are being handled as traditional D&D combat. This effectively means we ignore the Offense and Defense stats, and concern ourselves with just Mobility and Morale. We also ignore feats and equipment whose sole purpose is to improve caravan combat performance.
Sandpoint to Brinewall
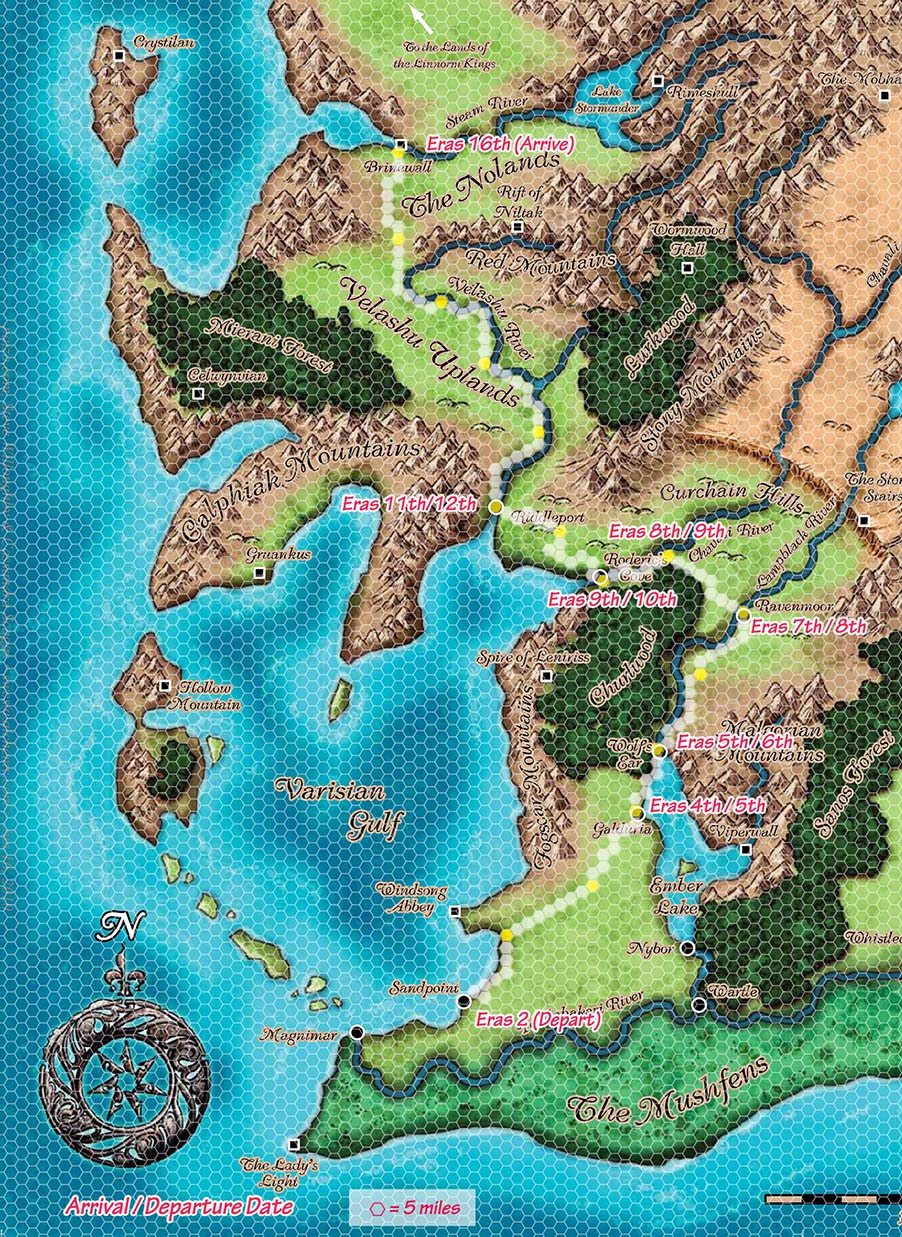
Scale: 1 hex = 5 miles
Sandru’s caravan started it’s journey with us as a Level 2 caravan with enhanced undercarriages, the Efficient Consumption feat, and a travel speed of 40 miles/day. We also added a second supply wagon due to the size of our party in order to ensure a generous safety margin with our provisions (and enough places for us to sit).
Our journey to Brinewall included overnight stops in Galduria, Wolf’s Ear, Ravenmoore, Roderic’s Cove and Riddleport for rest and trading. In Riddleport, we purchased a third supply wagon with an enhanced undercarriage: the Riddleport-Brinewall leg was 200 miles one way, and we were expecting this to be a round trip.
(The route followed the roads given in the Varisia, Birthplace of Legends player companion, with our GM generously allowing us to shorten the leg from Sandpoint to Galduria. Some fudging of the route was done to line up with the mileage given in the adventure path.)
The Brinewall-Riddleport Loop
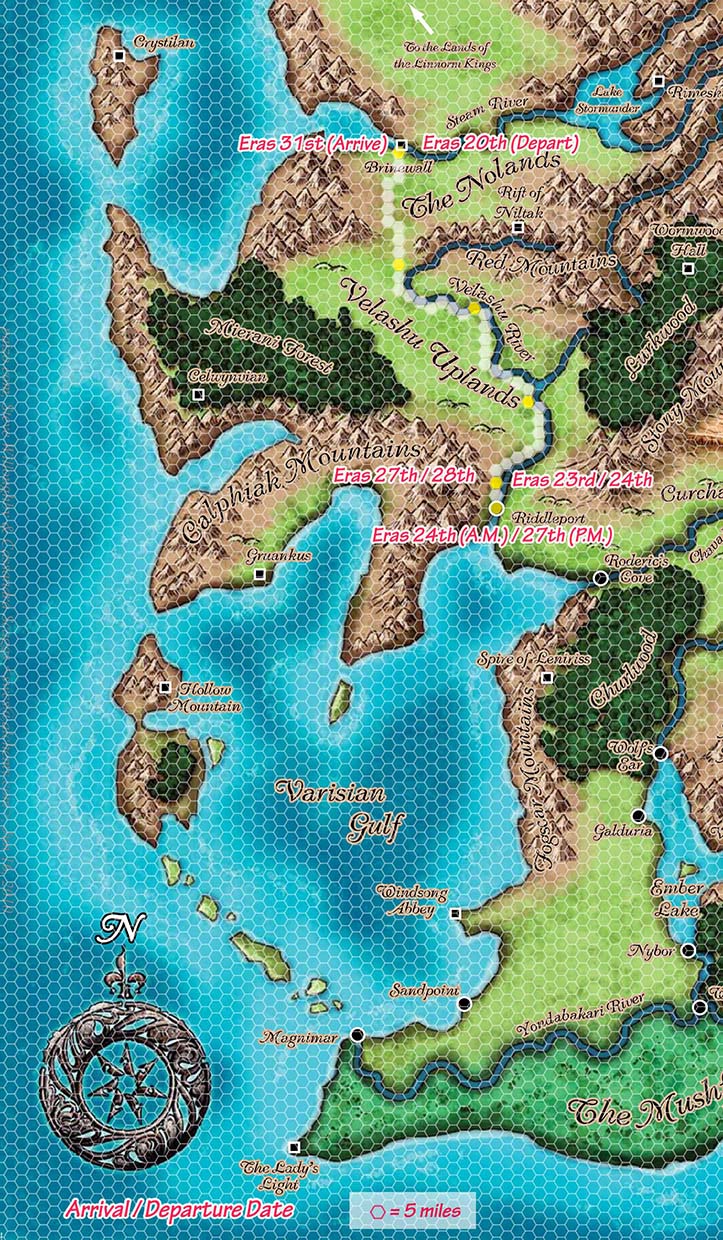
Scale: 1 hex = 5 miles
After the events in Brinewall, we opted to return to Riddleport to resupply and prepare for the journey north, as well as allow some of the PC’s and NPC’s to tie up some loose ends. At this point, we were a Level 4 caravan with two Faster Caravan feats, giving us a base speed of 48 miles/day.
To simplify the travel logistics, we traveled four days to the outskirts of Riddleport, entered the city the next morning and stayed until the afternoon of the fourth day, then departed again for Brinewall. This had us stopping for the night at the same points on the way down and back, while giving us nearly 4 full days in the city.
To Kalsgard
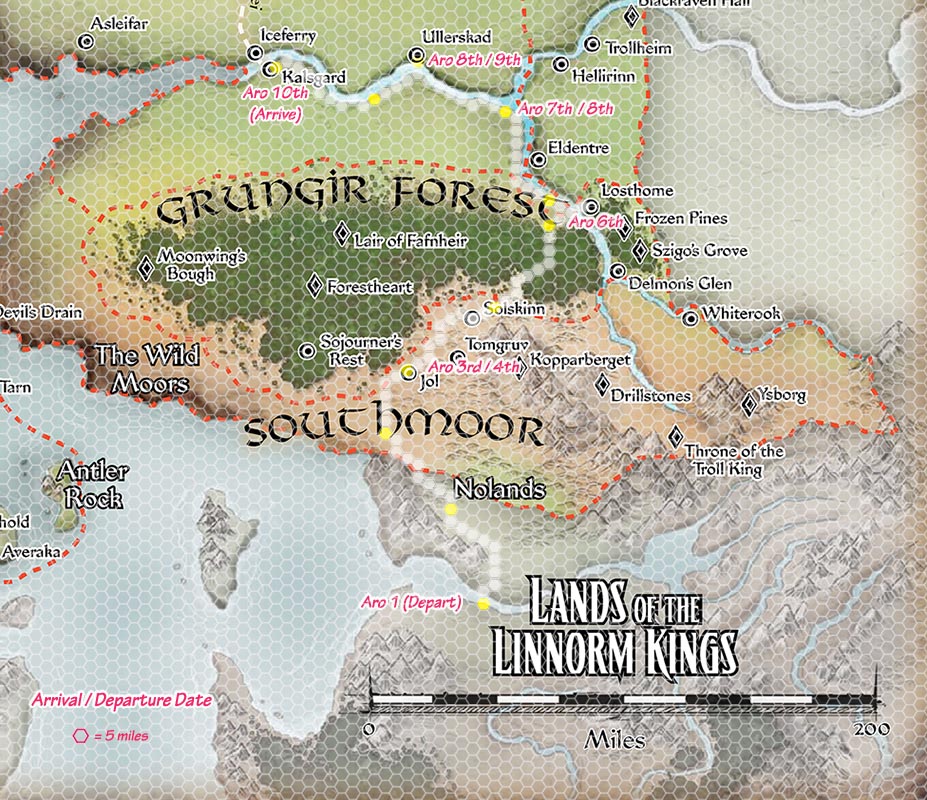
Scale: 1 hex = 5 miles
The journey to Kalsgard continued from Brinewall. Following the verbal description given to us by our GM, we worked out the likely route for the caravan (unfortunately, Paizo does not provide any road maps for the Linnorm Kingdoms).
We stopped overnight in Jol to trade, continued past Solskinn due to the forced curfew and mysterious nighttime abductions, and stopped just short of the Grungir forest. Travel through the forest was done in a single day, taking care to not stray from the road due to the reputation of the fey that dwell within.
After exiting the forest, we detoured to Losthome for trading (but did not stay the night) and returned to the road, continuing to Kalsgard along the west bank of the river, stopping for the night in Ullerskad along the way.
To the Rimethirst Mountains
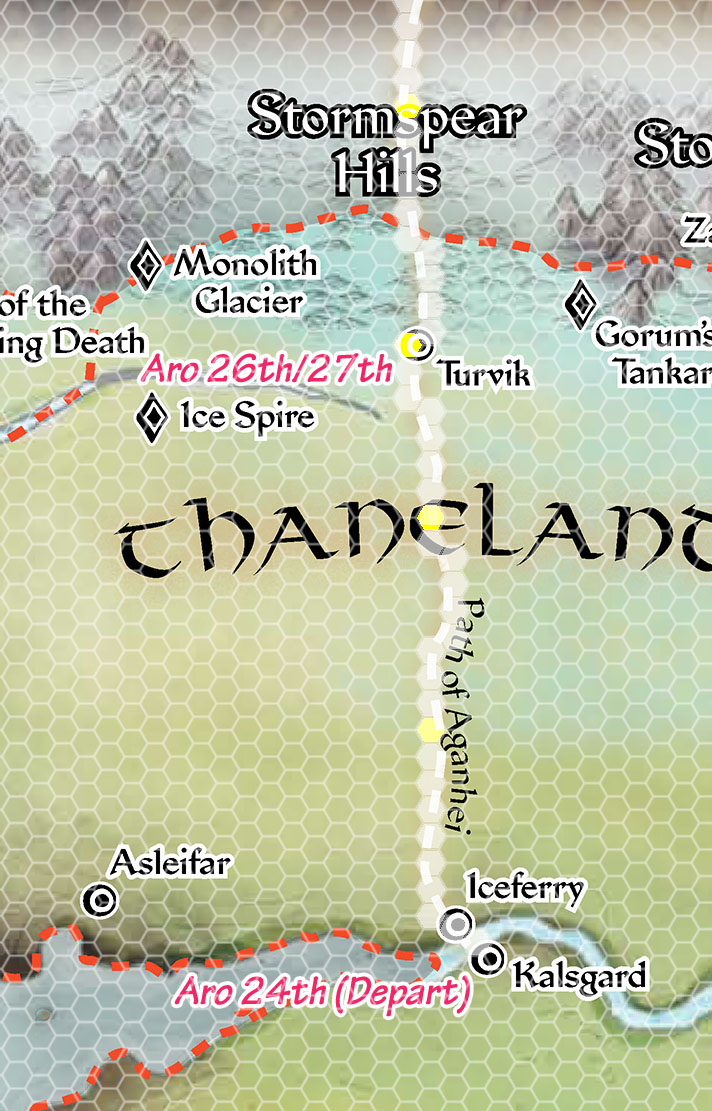
Scale: 1 hex = 5 miles
The journey from Kalsgard to the Rimethirst Mountains at the southern edge of The Crown of the World is mostly off-map. The Path of Aganhei has two branches on the Avistani end, with one branch leading west to the Lands of the Linnorm Kings and the other leading east to the Lands of the Mammoth Lords. No map is provided to cover this leg of the journey. The trip to where the two ends meet, and then head north to the southern edge of the Rimethirst Mountains, totals about 1,300 miles. We left Kalsgard completely packed with provisions save for trade goods destined for Turvik. We resupplied in Turvik and headed north.
To Iqaliat
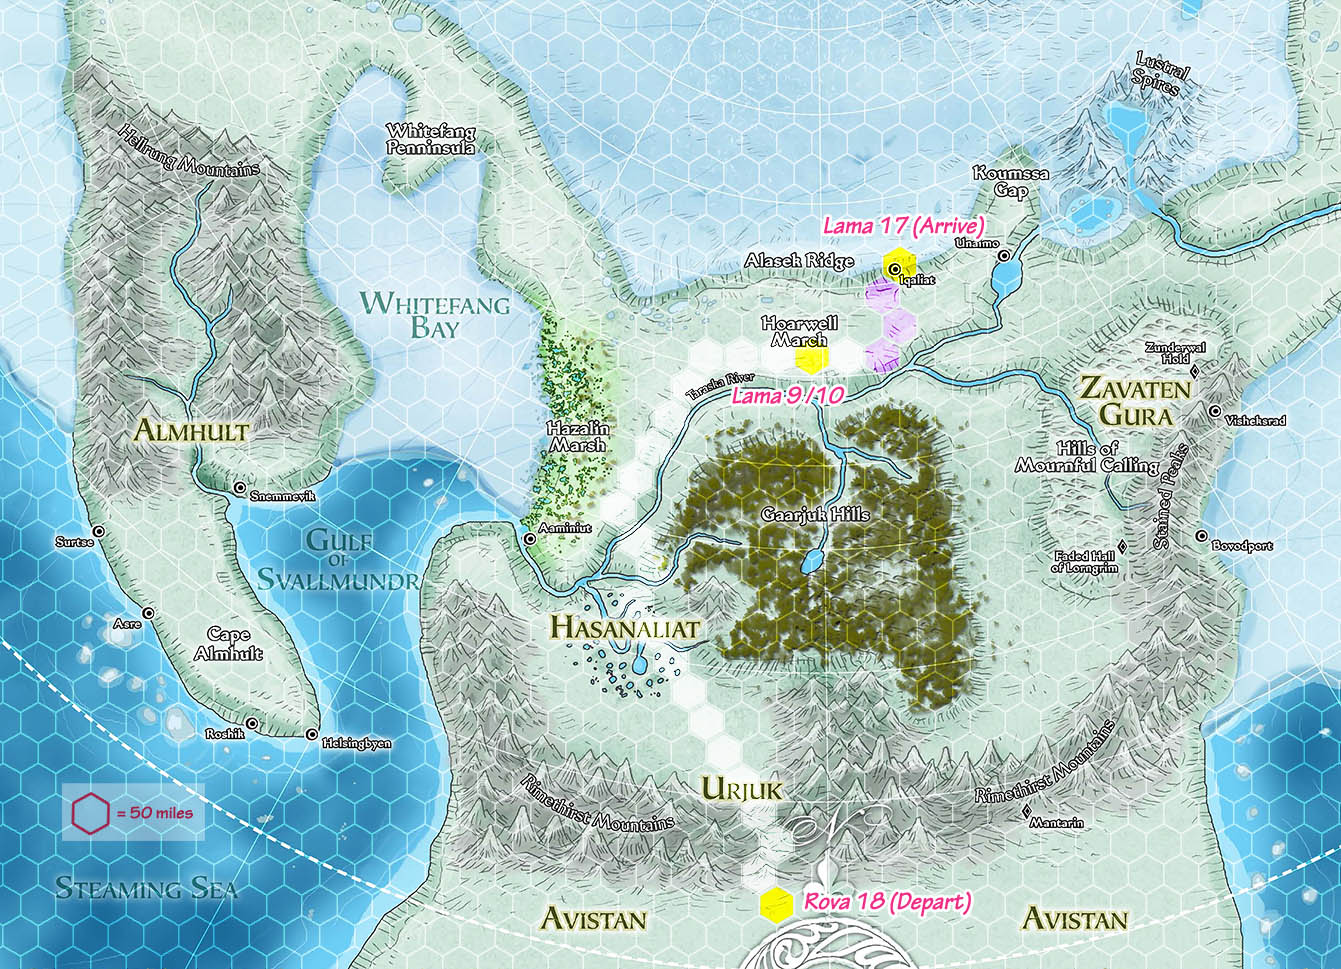
Scale: 1 hex = 50 miles
For simplicity at The Crown of the World, we used a 50-mile hex grid and rounded our caravan speed up from 48 to 50 miles/day. When we left Kalsgard we were a level 6 caravan with two additional Efficient Consumption feats, maxing us out at three.
We opted not to take the shortcut through the Gaarjuk Hills, instead following the standard caravan route which crossed the Taraska River north of Bearleg Lakes. The road then followed the river towards Unaimo, though Ulf suggested we detour to Iqaliat to get information about travel conditions before hitting the High Ice, proper.
An unseasonably cold storm rolled through as we neared Iqaliat, slowing our progress on the final 200 miles.
Iqaliat to the Storm Tower
The trip north began on Neth 11, just as the Polar Night was setting in. From this point on, the sun no longer rose high enough in the sky to light our path and our days were spent in total darkness, save for lights on the caravan. As a level seven caravan, we added Terrain Mastery (Cold) as a feat.
Scale: 1 square = 5 feet
We used a total of six lights: a pair of bullseye lanterns as headlights on the lead wagon, and one torch each on the remaining four wagons to provide a lighted perimeter. Each light was supplied by a divine Continual Light (CL3) spell in order to provide extra protection against potential Darkness spells. The overlapping light fields gave us a central core of bight light, normal light to a radius of about 40′ and dim light out to 90′. In front, our headlamps had a bright spot in a roughly 25′ cone, normal light in a 60′ cone, and dim light out to about 130′.
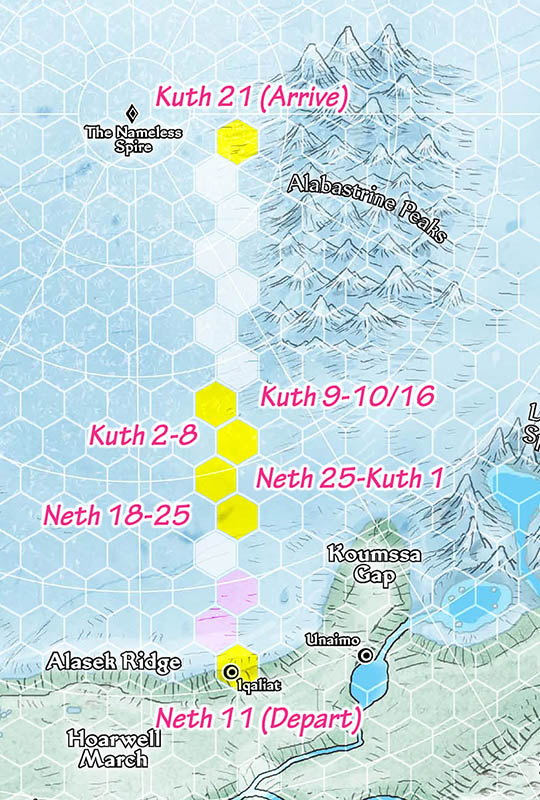
Scale: 1 hex = 50 miles
We started moving at half speed due to a failed Security check, which meant we had trouble finding a clear path across the ice. After that first week, we then hit the high altitude, and spent the next month adjusting to it so that we would not be fatigued. During that adjustment period, on Kuthona 2nd, we were attacked in the middle of the night by a boreal yrthak.
The caravan moved only 50 miles per week while resting—generally one day of full movement and six days of rest—which was just enough progress to stave off unrest without pushing ourselves too hard. Once the month was up, we followed the Alabastrine Peaks to the Storm Tower at full speed, finally arriving there on Crystalhue.
The Storm Tower to Dead Man’s Dome
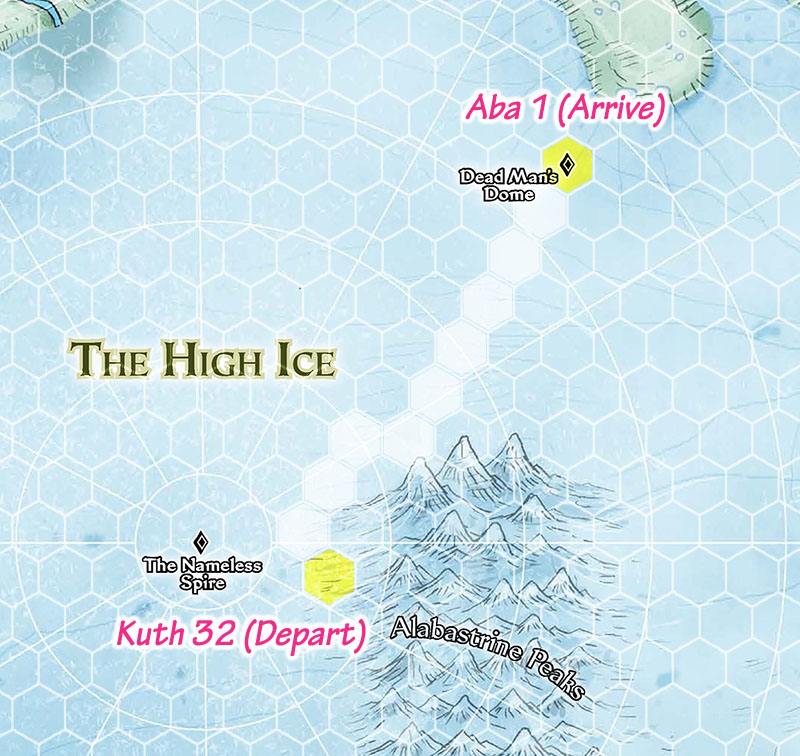
Scale: 1 hex = 50 miles
We set out Kuthona 23rd to rejoin the Path of Aganhei at Dead Man’s Dome, skirting the foothills of the Alabastrine Peaks before heading northeast. Fair weather was with us and with the exception of a strange encounter with a ghost one night, it was an uneventful journey until New Year’s Day. As we drew to within a few miles of Dead Man’s Dome, the caravan noticed several undead trailing behind the caravan, slowly forming into a small army. We reached the Dome mid-day, and made our stand.
Dead Man’s Dome to Ovorikheer Pass
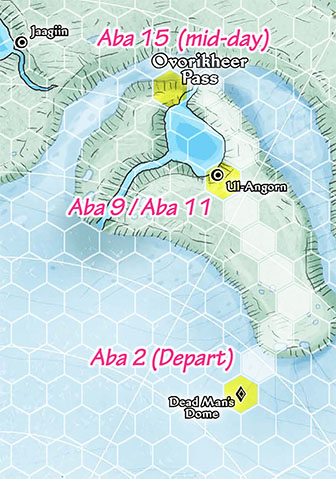
Scale: 1 hex = 50 miles
At Dead Man’s Dome, we rejoined the Path of Aganhei and followed it down into the basin to the town of Ul-Angorn. We stopped there, planning a stay of a couple of nights so everyone could have a break from the weeks of caravan travel in freezing darkness. On our first night there, we were attacked by an ogre mage that had been waiting for us so we kept our stay short.
The next leg of the journey climbed up to Ovorikheer Pass, a geothermally active region that required Security checks to prevent ill effects from the noxious gases. When we reached the summit, the caravan was ambushed by two, huge snow spiders.
Ovorikheer Pass to the Wall of Heaven
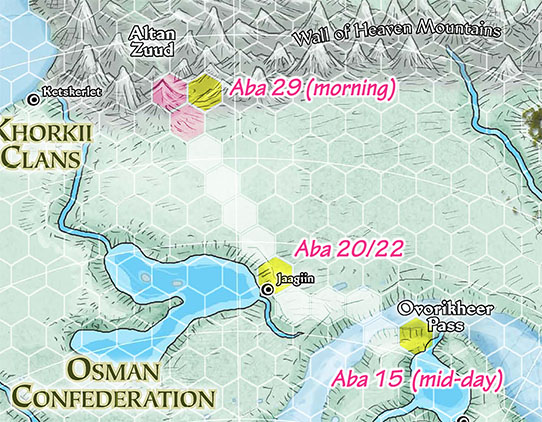
Scale: 1 hex = 50 miles
The caravan descended from the Ovorikheer Pass and off the High Ice, following the Path of Aganhei to the town of Jaagiin. We stopped for two nights to resupply, and then headed south towards Altan Zuud, the only mountain pass open through the Wall of Heaven mountains at this time of year. Storm clouds lay ahead of us, and as we began the climb the storm grew larger and more intense. On our second day of blizzard conditions, we determined that the storm was not a natural phenomenon. The path ahead was blocked by multiple avalanches, forcing us to turn back.
With no clear path across the mountains and an expanding storm threatening our safety, we attempted a Harrowing. The reading was unclear, but some of the cards reminded Koya of an old story about the Uqtaal clans that once lived in this part of the world. They had built a tunnel to allow their dead to pass under the mountains “to reach Desna, the North Star”. Nihali scouted ahead of us and found the entrance to the tunnel before the storm could overtake us. The caravan followed the Path of Spirits until reaching the Uqtaal Necropolis two days later.
Uqtaal Necropolis to Ordu-Aganhei
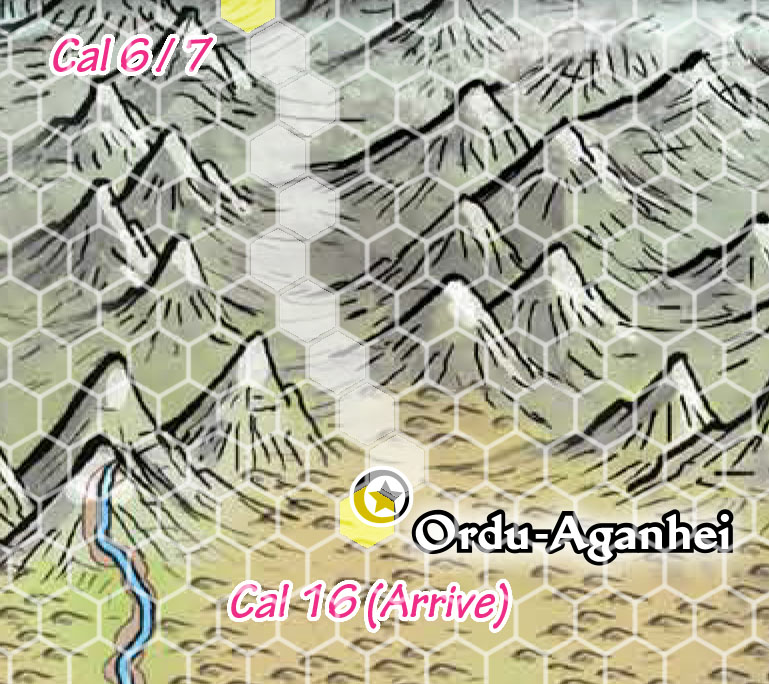
Scale: 1 hex = 50 miles
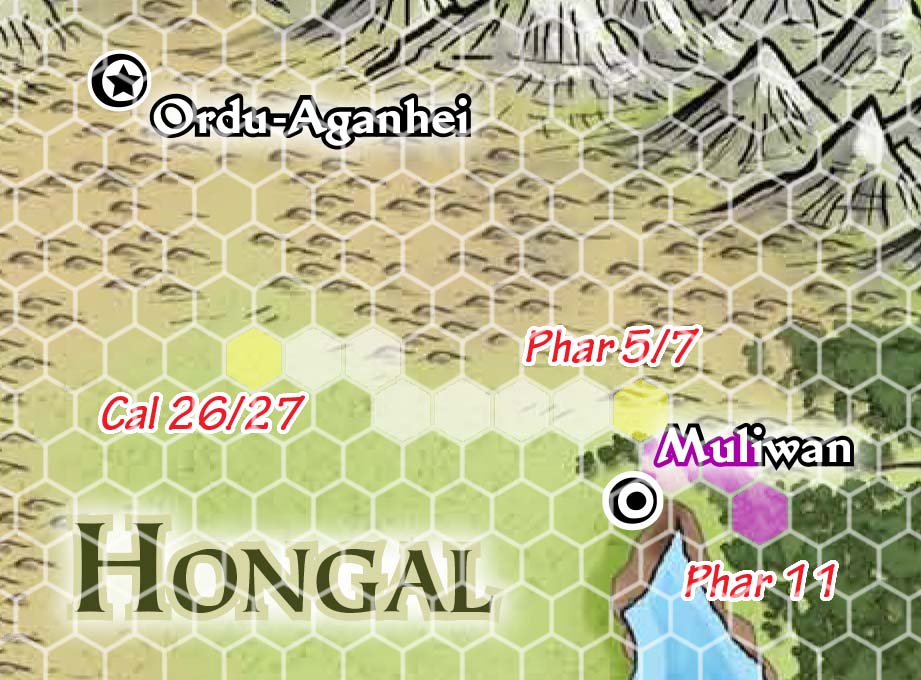
After leaving the Necropolis, the caravan had to travel nearly 200 miles through the mountains in order to rejoin the Path of Aganhei on the 6th of Calistril. From there it was a week’s journey down the mountain pass to Ordu-Aganhei along the northern border of Hongal, where we stopped to rest and resupply.
Ordu-Aganhei to the Forest of Spirits
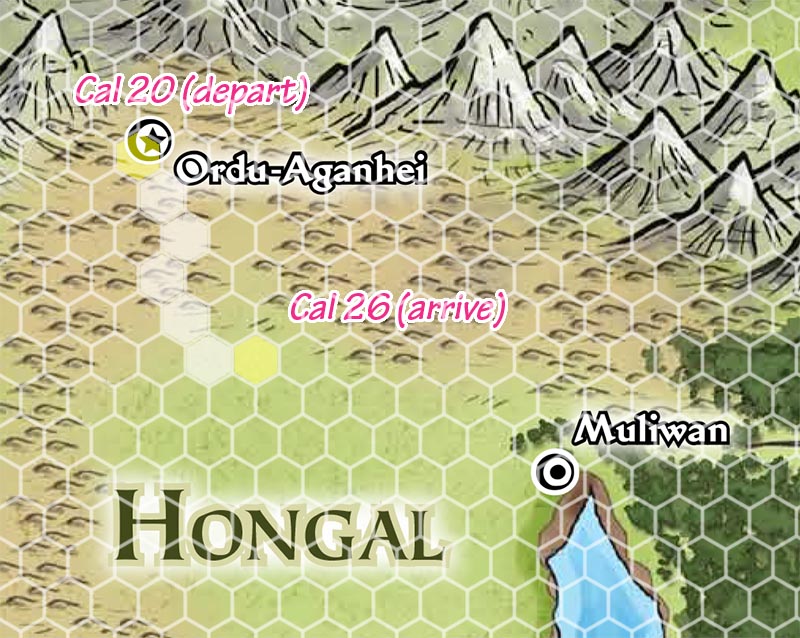
Scale: 1 hex = 50 miles
The Level 10 caravan departed Ordu-Aganhei in the evening on Calistril 20, traveling only a half day until very late at night. Since most of the travelers now had a Ring of Sustenance, we didn’t need very many provisions and thus were able to sell the two extra supply wagons. The last-minute addition of eight horses complicated matters, but we treated six of them as a horse train by the caravan rules, increasing our speed to 52 miles/day. Since we’d been rounding our speed up to 50 miles/day from 48 in order to ease the accounting, we chose to round our speed back down as well in order to balance it out.
In preparation for entering the Forest of Spirits, the caravan added Terrain Mastery (forest) as a feat.
 The caravan traveled off the main road, though within (distant) sight of it, in order to be less conspicuous. One the night of the 26th, the encampment was attacked by ninjas hired by the Five Storms.
The caravan stopped on Pharast the 5th while two party members went, in disguise, into Muliwan to sell loot and purchase supplies. It then entered the Forest of Spirits on the 7th. Due to the terrain, its speed was halved to 25 miles/day (rounded down from 26 miles/day).
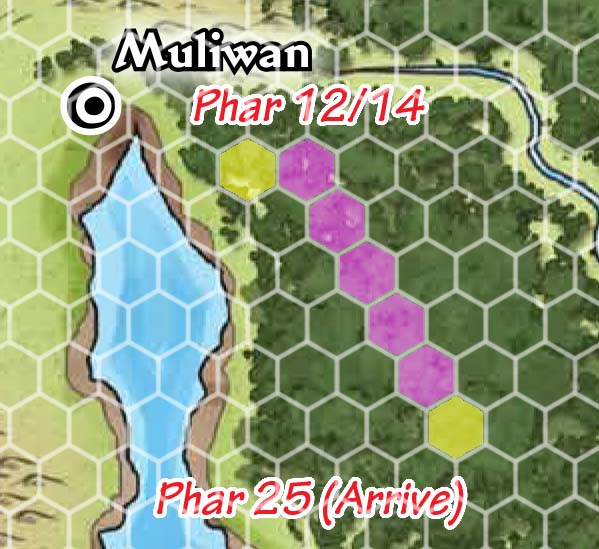 On Pharast the 12th, the caravan came across an active skirmish between an armored wagon and hobgoblins. All but one of the travelers on the wagon were killed, but the wagon was only partly damaged. We spent the afternoon and the next morning getting it repaired and outfitted with an enhanced undercarriage, courtesy of a Fabricate spell. The caravan then resumed travel with the added traveler and wagon until it came to a clearing, where a gathering of kami asked the party to investigate the House of the Withered Blossoms, approximately one day of travel away. The party left the caravan behind to investigate.
Forest of Spirits to Minkai
 After completing their mission at the House of Withered Blossoms, the party used Wind Walk and Teleport to travel back and forth to Muliwan in order to sell loot and rest.
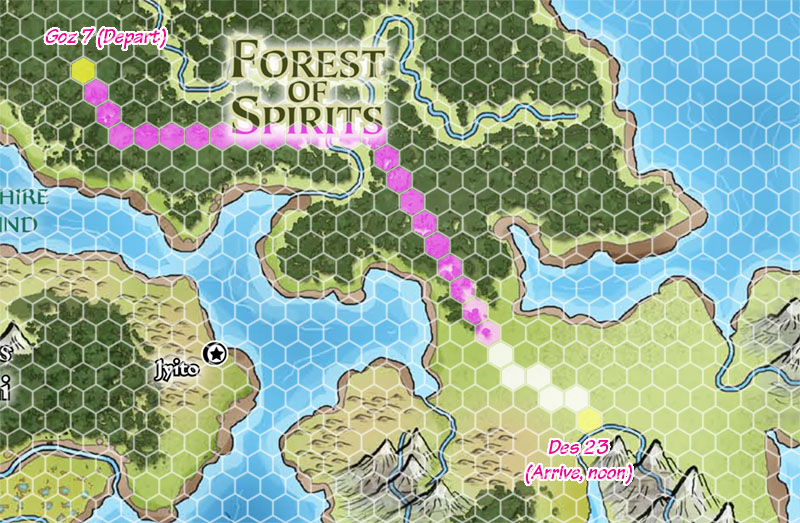
The final leg of the journey was through the Forest under the protection of the kami. At this point, the caravan had a travel speed of 56 miles/day thanks to enhancements, and the caravan emerged from the forest into the grasslands of Minkai on Desnus 18. Following Miyaro’s advice, they sought out the Ronin camp of Hirabashi Jiro in the Osogen Grasslands along the Kosokunami River.
The caravan would be too conspicuous if taken outside this region. Having successfully transported its travelers to Minkai, it ceased to be a game mechanic at this point.
Total Distance Traveled: 10,150 miles
I’ve just recently started running a JR campaign and I love what you’ve done with the hex maps here. I realize this was posted quite a while ago, so I’m not expecting much, but if it’s not too much trouble, I was wondering if you happen to have a clean version of those images (without the dates and the path traveled) that you’d be willing to share with me. In either case, thank you for your time. 🙂
Hi, Eric! Thanks for taking the time to comment. I’ll email you about the map images. I am willing to share, but am conscious of Paizo’s copyright. We can work something out that won’t infringe on their rights.
Some other tools that you may find interesting for Jade Regent:
Hi John,
I’ve just recently started running a JR campaign too, where did you find the hex maps ?
In France, I have not seen this type of map.
Thanks
séb
I created the hex grid myself and overlaid it on the map images.
ok, thanks
What ratio did you use for the hex grid?
5-mile hexes through the Lands of the Linnorm Kings, and then 50-mile hexes for the Crown of the World and Tian Xian.
Hi, John
I don’t know if my prior comment went through, because my internet is garbage, so I thought maybe replying could make it easier for the comment to go through. I am super impressed with these hexed maps, and I am currently running JR myself. I realize this is super late, but I was hoping to maybe get a copy of the maps? If it’s not too much trouble.
I already commented once, but when I reloaded the comment was gone, so I don’t know if it went through. In any case, thanks in advance.
Very nice description! We’re into the second module now and the PCs are at Kalsgard. I’m trying to understand why Sandru wants to bring the whole caravan all that way. Do you have any thoughts on that?
Perhaps it’s in the module but I missed it?
The AP gives it thin treatment. The gist of it is that Ameiko has hired his caravan to take her to Tian Xia. You can’t teleport with the Seal, even if that was an option at this level, and traveling by ship is impractical because it’s literally half way around the globe, or a dangerous crossing at the arctic…which you’d still have to get to on foot. And it’s too far to walk, and you need to carry a bunch of supplies with you, and have room for everyone to sleep, eat, and generally live. So you have to take the village with you, and this is the option.
Presumably, Sandru is interested in trade possibilities, too, so it’s not just a passenger ferry, but a once-in-a-lifetime business opportunity. If I were GM’ing this, that’s how I’d play it up. He used to be an adventurer, and is willing to take the gamble on risk vs. reward, especially with 4 to 6 PC’s and a couple of NPCs coming along.
Hey, I am running a Jade Regent Campaign as well and was really interested in the Hex Maps.
Would you be willing to help me w/ clean versions as well. I have the PDFs of the folio but I would really like to use the hexes like you for there journey.
Cant wait for the email. 🙂
Check your mailbox.
Hello, sorry to bother you like 2 years after your last interaction, but I’m currently running JR myself, and as you probably know, finding actually usable maps for the caravan travel sections is utterly painful. I love the measured hex maps, and I was wondering, if it’s not too much trouble, if I could grab a copy? My party are just about to start their journey northward from Brinewall, and being able to actually visualise the journey would be amazingly useful. Thanks in advance.
I’ll email you.
Much appreciated
Hello! maybe is too late to cheer for your group, but here i am. I have read all your JR’s story and it was really a great travel. I hope to do well as you have done with my group. Can i ask you if you have a Discord or a group where you share maps or tips for new Dms for the adventure paths that you have played?
No Discord group, sorry. We live in the same area and play mostly in person.